
How to Create the Perfect Welcome Onboarding for New Clients

How to Create the Perfect Welcome Onboarding for New Clients
BY MICHELLE KNIGHT

Today, Brandmerry has group programs and courses, and a membership community called Brandmerry Academy, and I also still do private one-on-one coaching.
But private one-on-one coaching is how my entire business got started. It is all that I offered for really the first eight months in business because I really wanted to test out my strategies and my framework.
I essentially wanted to work with clients and get testimonials, which was a smart business move.
And, I wanted to make money quickly because I wanted to leave my nine to five. So one-on-one coaching/ consulting was really a really great way to do that.
Throughout the years, I have worked with hundreds of entrepreneurs who are also coaches, consultants, graphic designers or photographers and can say that anyone who is currently working one-on-one with clients will benefit from today's blog.
THE CLIENT ONBOARDING PROCESS
I pride myself on the onboarding process for all of my programs. In a few videos and blogs that we did last month, I talked about the onboarding process that I follow for my courses and my group programs.
But, today I wanted to share with you my one-on-one onboarding process because it is different and there are some additional things that you want to have in place from what you might do for an automated course.
Now, one of the products that I'm going to be sharing with you today that I love is called HoneyBook. If it sounds good to you and you want to give it a test run, you can actually get 50% off your first year using HoneyBook by going to brandmerry.com/honeybook.
I am an affiliate and if you decide to go with that discount, I will receive a little kickback, but I don’t recommend any product I don’t personally use in business.
Today, we’re focused on the eight steps to the client onboarding process, and then a little bonus that I really love about HoneyBook specifically.
CLIENT ONBOARDING STEP #1:
THE CLIENT APPLICATION
The first thing that I recommend is that you have some sort of application or form that your potential client completes.
Many of my clients are jumping on the phone with potential clients or having some sort of email correspondence back and forth before the actual investment, and I find that that's really great for a few reasons.
The main reason is that you get to know your ideal customer to see if they're actually a great fit for you and your brand and they get to ask some additional questions from you for further clarity. Because when it comes to one-on-one services, sometimes people have very specific things that they want and the product itself is designed to be kind of customizable.
Even for my photographer clients, they're customizing some of their packages based on the type of wedding that their client is planning on having, so that is really helpful to work those things out before payment.
The goal is to get your potential client to answer some important questions that will help you better “sell” and customize your services for them.
If you are a wedding photographer, you want to ask questions like, "What's the wedding date? What is the theme? How many guests? Do you have a location?"
If you're a graphic designer and someone is applying for your services, maybe you want to ask questions like, "Are you looking for a logo? Are you looking for a website? Are you looking for social media templates? Do you have a brand established or do you need support with that?"
By asking these types of questions, you can go into the conversation with the information that you need to close the contract a lot faster.
If we're going back and forth and back and forth or spending 20 minutes of our call asking these types of questions, then we can't really get to the important part, which is how you can ultimately support them by investing in your service. So asking these questions on the front-end is really helpful.
For my VIP Intensives that I offer monthly, I have an application. You have to apply for that spot and our correspondence is done via email, and while I no longer offer Discovery Calls for this offer, I did in the past and I used this form to discover more about my potential client before the call.
Your form or application can be done in a lot of different ways. We've created a form in HoneyBook, which we’ve embedded on my website so it looks really native to my website and my brand and then all of that information is stored in HoneyBook for that new potential client, which is fantastic as we move through the onboarding process.

CLIENT ONBOARDING STEP #2:
CLIENT SCHEDULING
The second step is scheduling.
Now, if someone is going to be scheduling a call with you after they filled out their form, you want them to do this right away and you want to send them directly to a scheduler. HoneyBook does have a scheduler native to their platform, but we also love Acuity as well.
We've been using Acuity for a really long time, so it's one of our favorites, but you can absolutely do this all in HoneyBook. Everything that I'm sharing with you can be done in Honeybook, which is really nice.
So whether you are having a scheduled call with them, or you're going to be doing email correspondence, just let them know prior to the application.
If offering them a Discovery Call, then take them directly to schedule a call with you with your respective platform. This is important because nobody wants a back-and-forth situation. If I email somebody and I'm interested in working with them, I don't want to go back and forth to find a time that's available. I want to just look at their calendar and pick a time that works with my schedule.
It’s important to take the time to set up your calendar with your availability so this process is seamless for your client and you don’t find yourself double-booked. You also want to set up your scheduler to send reminder emails for your scheduled call so you don’t have to manually send these out.
We do this for our sessions as well. I don’t have my clients email me saying, "Hey, do you have time this week?" No, they have the link and can go to my calendar and find a time that’s available. Like I said it takes that back and forth out, which is important because no one wants to waste their time on that stuff.
After the application (step one), you want to either send them directly to your scheduler or have something that pops up on the screen, a confirmation page that says, "Your application was received. You'll be hearing from myself or my team within 48 hours." And that's what we do over here at Brandmerry now.
CLIENT ONBOARDING STEP #3:
HAVE THE CALL OR EMAIL EXCHANGE
Step three is either having that discovery call or that email exchange, which you’re able to handle with so much confidence because you had them fill out the form already.
You have the information that you need to lead the conversation, to support them, to answer their questions so that you can ultimately close the timeline from inquiry to sale. That's really important because you don't want that process to be long and drawn out, as that can decrease the conversion rate for your sales calls.
We love to do our correspondence in HoneyBook. As I mentioned, someone is applying, their information is going directly into HoneyBook and now all of our communication can happen there as well.
I can see the emails in Gmail and can reply there if that’s easier, but I also have the Honeybook on my phone so it’s super simple. No matter what option you choose, responding directly in Honeybook or Gmail, all of the emails are logged in Honeybook so you never lose track of client information.
My team can log in and communicate as well, and that's really beautiful and seamless. We also love to add notes in there if there is a specific note we want the team to know about a potential client and where they are in the process we can track all of that there.
For calls, we usually hold those on Zoom, but you could also use Google Hangouts as well. For the calls, I like to keep them super simple. Remember you have all the information you need so these calls are to answer any questions your potential client might have, remind them of why they booked the call and how you can support them in reaching their desired outcome.
CLIENT ONBOARDING STEP #4:
THE PROPOSAL
Okay, now you've had the call.
You've had the email correspondence and we're ready to rock and roll, right?
Step four is typically the proposal section.
This might be the final email that says, "Okay, this is what you get when you enroll. You're going to get this much time with me. You're going to get this much support. It's this much money. Here is the link to sign up or here are the next steps."
You want to lay it out and say, “This is how we get this party started. This is how we rock and roll."
Another thing that you can do at this stage and another reason we like HoneyBook and many of my clients use it as well is that you can craft really beautiful brochures and proposals.
A lot of my photography and graphic design clients will have saved proposals where they have the packages outlined and then they'll go in and they'll customize that based on what they’ve learned about their potential client.
For example, they’ll add that particular person's wedding date, and if they know when they're going to have the engagement session, they'll put that there. They make it customized to the customer, and that's really amazing because it shows that attention to detail.
If you're a graphic designer, an interior designer, or a photographer and you’re creating custom packages, you can use this amazing tool to send a really beautiful custom brochure to your potential customer. And then within the brochure, they can actually click and it can be linked to the contract. So then they can go on to the next step.
If you’re not doing the brochure feature, you’ll just present the next steps for your new client and move to step five.
CLIENT ONBOARDING STEP #5:
SEND A CONTRACT
With high-level one-on-one clients, big packages that you're talking about anywhere from maybe $1,500 to $30,000, depending on how long the contract is or what it is, you want to make sure that you have a contract in place.
I personally recommend contracts for each private client but at the very least a clear Terms and Conditions.
HoneyBook has templates available for your contract, which is really nice. Although, I do recommend going through a legal service or a lawyer to get a contract drafted.
Just do your due diligence because it's important to stay protected. And it's a great way to make sure that you and your customer feel really, really good about the relationship that you're heading into and a way for you to both sign it and kick off this entire party.
You’ll want to send the contract at this stage, and as I mentioned, we use HoneyBook. The contract itself can go through HoneyBook and then you can customize the email that goes with it as well.
Inside of the email templates that we've created, it says, "Your contract is here. So excited to get started. After you sign your contract, your invoice will be delivered immediately." And we have all of those set up in a workflow.
In fact, pretty much everything that I've shared with you besides the proposal phase is all automated, which is very nice.
CLIENT ONBOARDING STEP #6:
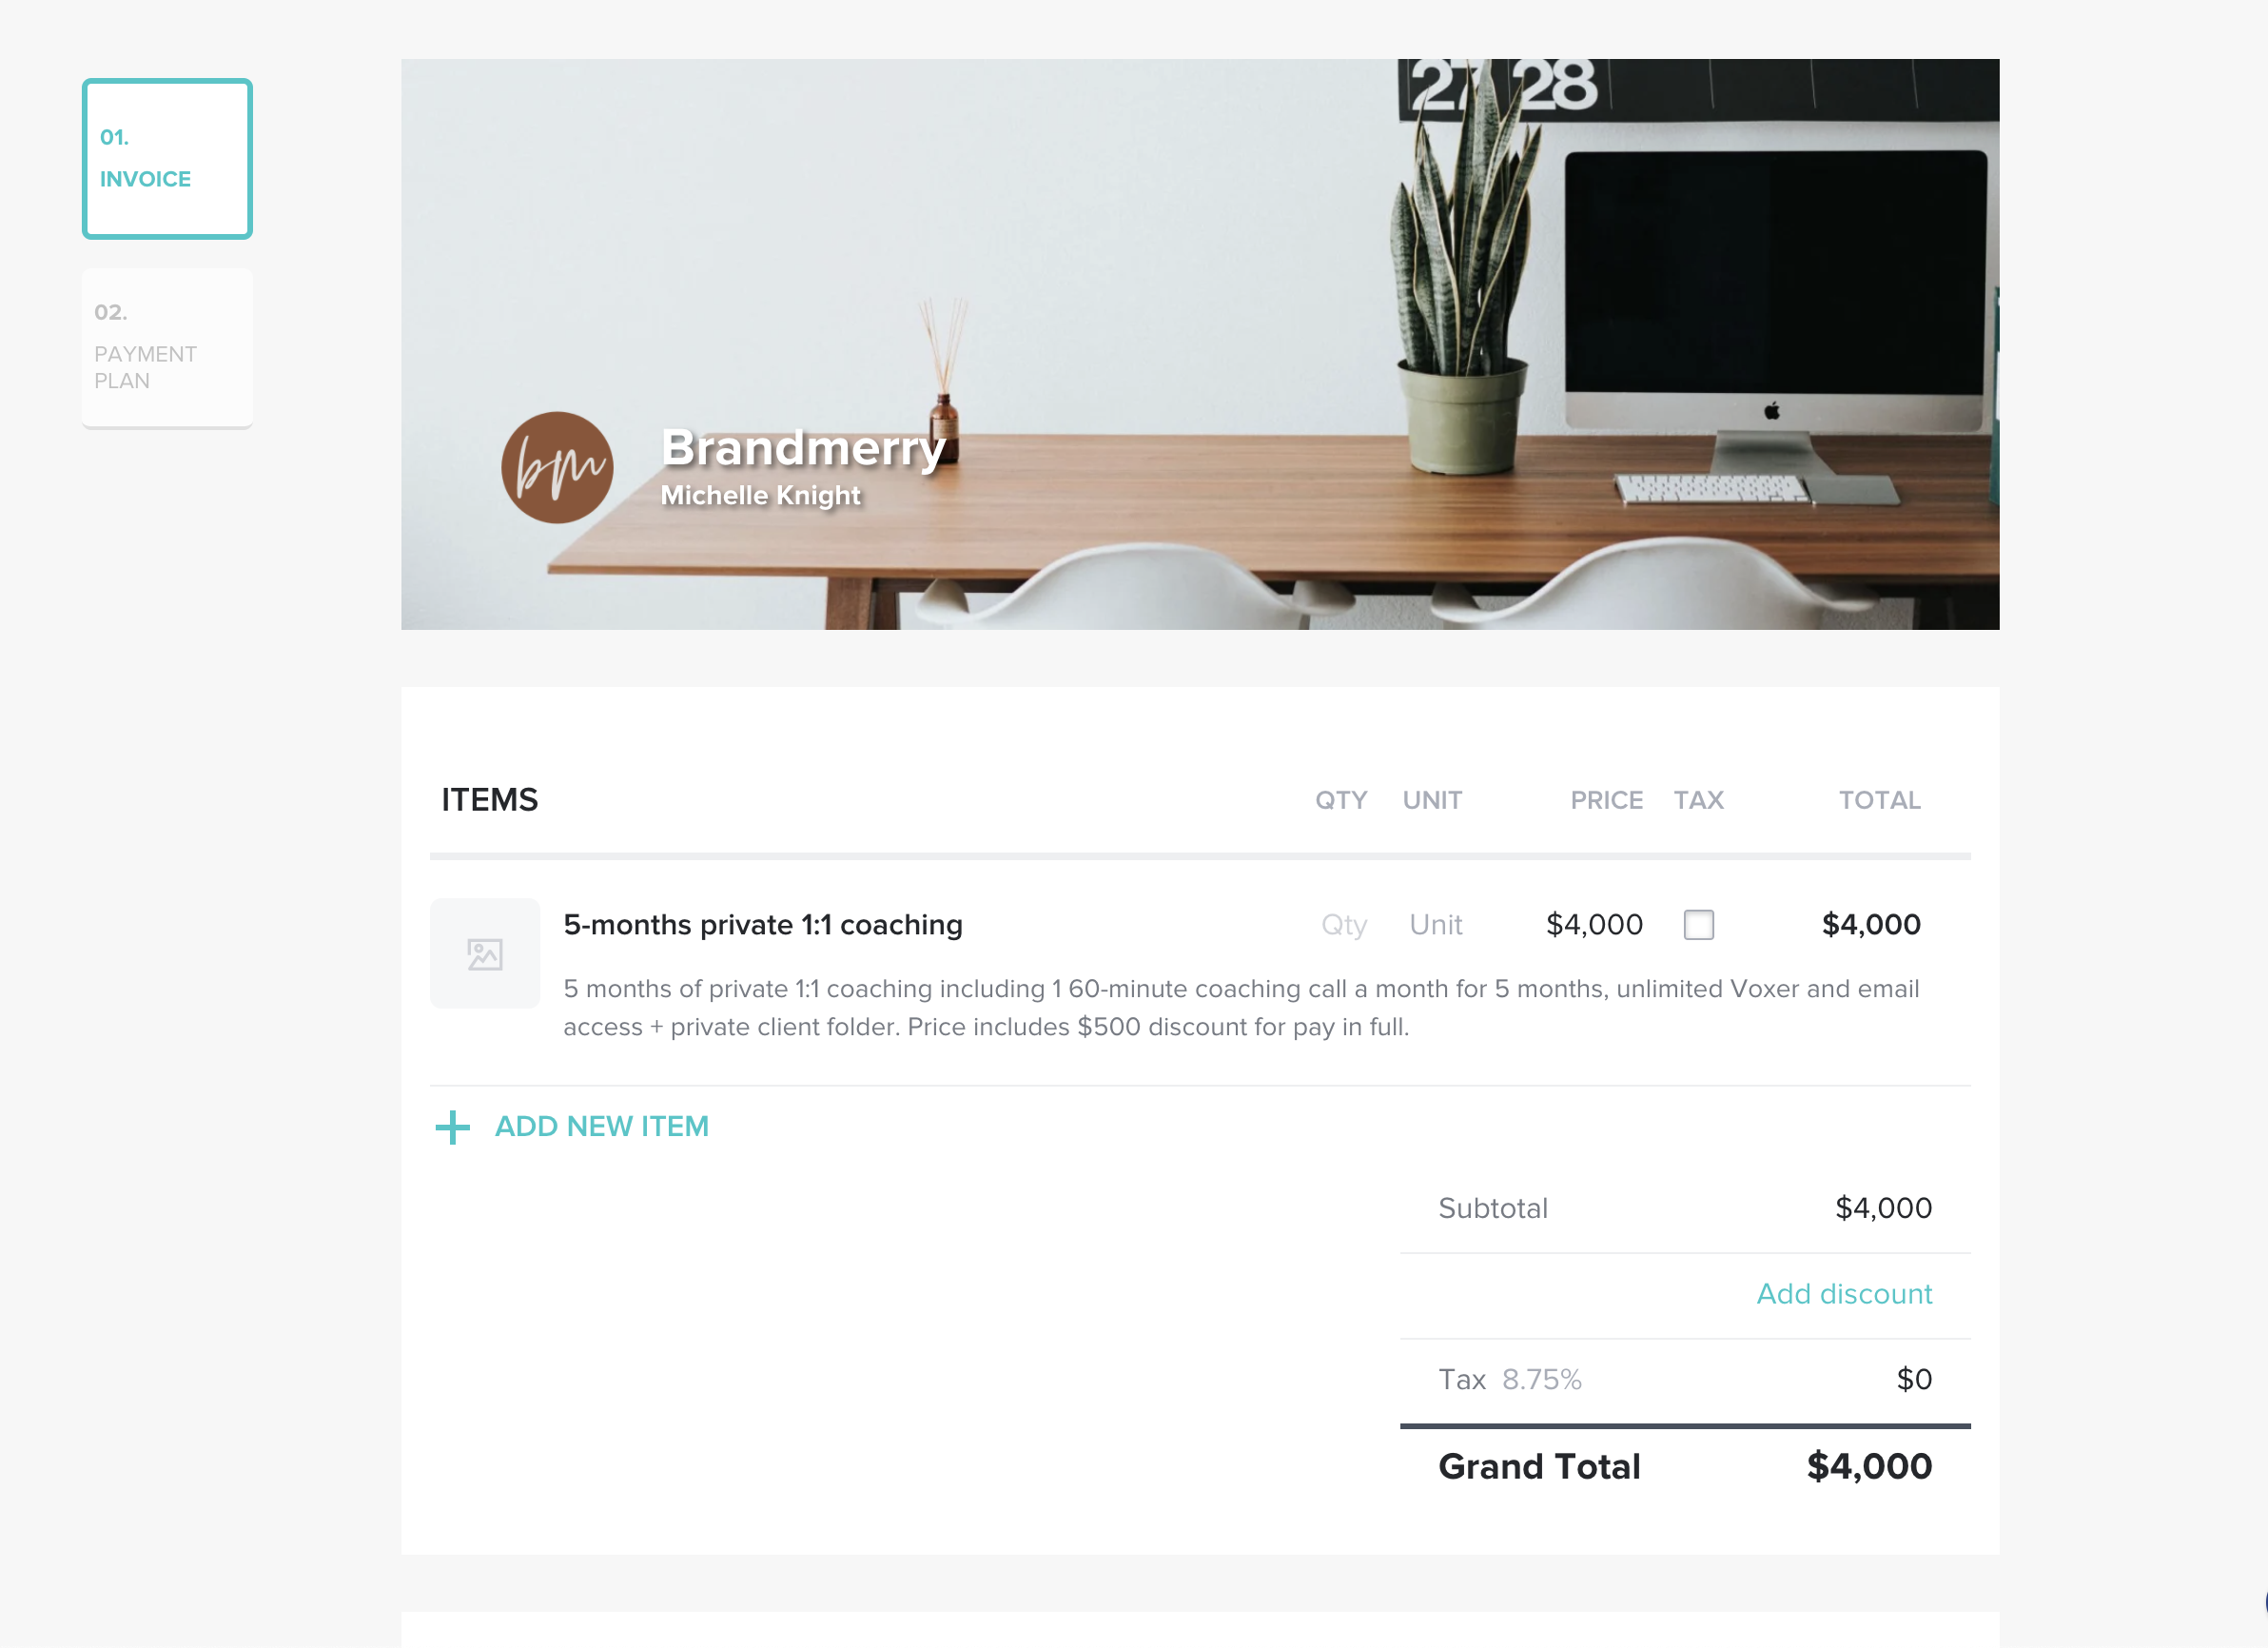
SEND THE INVOICE
Then we move on to the invoice, which is number six. This is where they're ultimately going to pay for your services.
And again, you can set this template up ahead of time, go in, make any modifications to the numbers or payment plans that you want, and you can kick that out.
There are a lot of different ways to collect a payment, but one of the reasons that I love HoneyBook is that you can easily offer pay-in-full or payment plan options, 100% customized to your client.
You can customize the payment breakdown; maybe it's every month for six months, maybe they're doing more upfront and then a little less the remaining five months. Do they want to automatically do that? You can set that up as well.
I love having a template and then being able to go in and quickly adjust the payment schedule without a lot of fuss - It just makes the whole process so easy. And again, you can create all these templates and workflows so that it's just automatically happening on the backend with the platform.
Some of my clients also have customized workflows based on their different tiers. My graphic design clients might have just a logo package and then a logo and website, and then a logo website and retainer. They can customize these workflows, and after that initial proposal is accepted, they can just tag them in that workflow and then they're getting those customized emails, which is lovely.
Same with my photography clients. If they have an engagement, or a newborn, or a family, or a wedding, they can customize all of that inside of HoneyBook specifically.
CLIENT ONBOARDING STEP #7:
NEW CLIENT WELCOME EMAIL
So contract and invoice bring us to number seven, which is the welcome email. It’s the “Congratulations-we're-embarking-on-this-relationship-together email!”
I always tell my client this is where the important information lives. If anything is floating around in your new client's head or they're a little uncertain about something, this is where you want to take care of all of that.
So these emails tend to be a little bit longer because you want to cover everything and that’s why we prefer to save them as templates to use with each new client, and yes we do it in Honeybook.
Here at Brandmerry, we make sure to include the following:
Keep in mind this might be different for you based on your offering, but it’s a great template to follow.
WELCOME: Welcome the new client to the family
BONUSES: Remind them of any bonuses that they receive as part of your program. My clients get access to my signature course You! Branded so we include that information here and their log-in information.
SCHEDULING: We include a direct link to my scheduler so they can find a time that works for them and encourage them to save the link so they can schedule any future sessions if necessary.
CLIENT FOLDER: My private clients receive a private link for our shared documents, notes from their calls and recordings. We provide their link to the Google Drive folder in this email so they can begin adding materials if needed.
TIMELINE: Depending on when the scheduled first session or intensive is we also provide a brief timeline on what we want them to complete prior to their first sessions. For instance, my VIP Intensives book out months in advance, so we’ll say, “Before our session, these are the things that I want you to work on and put into our folder so that we're ready to rock and roll."
QUESTIONS: In addition, we make sure they have all the details they need on the level of support they receive when their support starts and who to email should they have questions about support, billing or anything else.
The goal of this email is to make sure they’ve got everything that they need and they're not emailing us and feeling confused or lost; they feel confident and supported straight away.

CLIENT ONBOARDING STEP #8:
CLIENT WORKFLOW AND TRACKING PROGRESS
When someone becomes a client, that whole onboarding process is so important, but then how are you tracking them?
Are you sending them surveys before their sessions, to get information to prepare?
Are you checking in with them? Are you asking them for feedback?
This hands down is one of the reasons that I love HoneyBook because it allows me to pay attention to when someone's contract is ending or when their session is coming up.
I can set up a workflow to automatically send out a form 24 hours before a session so they can complete and give me all the necessary information so we can make the most out of our time together. This workflow is based on where they are in my client progress tracker.
So while one through seven was before the session, or maybe even the date your package really kicked off, don't forget about tracking progress, staying in contact, and organizing that entire part so you don’t miss the opportunity for client feedback and possible continuation of a contract.
One of the last things I want to share with you about HoneyBook, one of the things that I love is that if you are a graphic designer and you need approvals, you can create client portals in the platform as well, which makes it super easy to keep everything clean and in one area for your client

CONCLUSION
Follow this 8-part onboarding process and I promise you’ll support your clients at the highest level and recognize how much can be automated with a platform like Honeybook.
Like your new email subscribers, your client onboarding of sending contracts, invoices and emails can be automated and creating those templates can save you quite a bit of time.
I hope that this was really helpful for you to understand all of the different processes of the client onboarding process.
If you want to try HoneyBook, you can go to Brandmerry.com/Honeybook to get 50% off your first year after your free trial and give it a spin.

Watch the full video here!
P.S. Have you tuned in to The Beautiful Climb podcast? I release new episodes every other Friday on topics around productivity, motherhood, habits, goals and going after the life of your dreams! Check out past episodes and be sure to subscribe at thebeautifulclimb.com
- FREE GIFTS YOU'LL LOVE -


DISCOVER YOUR BRAND STORY IN UNDER 5 MINUTES
LEARN HOW TO WRITE AN ‘ABOUT ME’ PAGE THAT CONVERTS
MAP OUT 30 DAYS OF CONTENT IN UNDER AN HOUR
- READ THE LATEST POSTS -


MEET MICHELLE
Hey there, I'm Michelle Knight and I an online branding and marketing consultant for female entrepreneurs.
I believe in the power of storytelling and using that superpower to brand and market yourself online...oh and to set yourself free.
I'm obsessed with living a life of freedom, so much so, that my family and I now travel full-time while running my business from the road.
This blog serves as a home base for all things branding, marketing, content creation and more.